Tuesday, 22 December 2015

Klein Barrel Blender


My biggest mistake with the creation of this klein 'barrel' was attaching the mesh together half way up the handle, causing an inconsistency in the rendering. I will try attaching the handle at the meeting point of the inner and outer surface (if you can call them so on a klein object..)
However, I have discovered the joys of proportional editing, whereas before I was trying to use sculpt mode or edit each string of vertices separately,


https://en.wikibooks.org/wiki/Blender_3D:_Noob_to_Pro/Every_Material_Known_to_Man/Glass

Realistic Glass[edit]

Glass (Click to enlarge)
Material
Alpha: 0.1
Color: White (hex code: FFFFFF)

Shaders
Reflectivity: 0.2
Specularity: 1.5
Hardness: 511
Translucency: 0.5
Ambient: 0.5
Emit: 0

Mirror Trasp
Ray Mirror: enabled
Ray Mirror: 0.2
Ray Transparency: enabled
IOR (angular index of refraction): 1.37
NOTE: it is suggested to play with the Fresnel for transparency.
Note: Don't forget to enable raytracing on the render tab (Press F10 in the buttons window, then go to render tab within that window and click the button Ray which will enable the raytracing). Raytracing is enabled by default in Blender 2.37 and higher. (This setting only applies on rendering while using Blender Internal, not suitable for others like Yafray.)

Mirror Glass[edit]

Here is an example of some glass that is less transparent and more reflective, almost a mirror. Just play with the "Alpha" setting until you get the effect you want.
Glass: Click to enlarge
Material
Alpha: .2
Diffuse Color: R .74, G .776, B .818
Speclular Color: R .676, G .732, B .798

Shaders
Diffuse Shader: Oren-Nayar
Reflection (Oren-Nayar): .959
Roughness (Oren-Nayar): .818

Specular Shader: Blinn
Specularity (Blinn): .731
Hardness(Blinn): 179
Refraction (Blinn): 10

Mirror Trasp
Ray Mirror: enabled
Ray Mirror: .56
Ztransp: enabled (this is very important, otherwise when you set your alpha value, only your background color will show through, not the object behind the alphaed object)


Practical development: Maya and Blender Barrels

Maya

I struggled with the UV unwrapping and mapping, especially in equalising the pixel densities so I will recap by watching online tutorials at home.


Blender


Saturday, 19 December 2015

Maya tutorials

All 2016 shortcuts

Room Taautorial

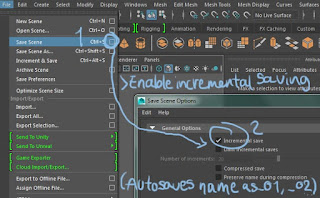
Save settings


Mapping UV seams
https://www.youtube.com/watch?v=I30SW-H1y5I


Friday, 18 December 2015

Practical: Photoshop brushes and textures

Creating effective Photoshop brushes and textures

Blur edges of texture to avoid jarring edges: new layer screen, fill with white, paint over with a feathered brush. Also lower saturation/greyscale and adjust levels to give a higher contrast to the texture.

Ensure when defining brushes, that the pattern is aligned to ensure waving does not occur when tessellated (use the warp tool).


I am happy with the selection of brushes I have created, now to apply them in practice.

TIP: Give a 3D effect to a brush mark by copying the layer, locking the transparency and painting over the top, slightly offset layer with a lighter brush.

Friday, 4 December 2015

Practical development: Blender lamp


  • Added mesh circle
  • Tab to enter edit mode
  • Set origin point to back of circle
  • A to select all
  • 1 then 5 to set to front Orthographic view
  • Z to see wireframe and B for marquee select (much easier in Ortho than perspective)
  • E then Z to extrude on Z axis
  • E then S to extrude and scale inward until curved enough. With the origin point set at the back, the shapes stagger, fanning out from the origin point
  • Rearranged until happy with the curvature
  • Add modifier: smooth
  • Smooth vertex
  • Turned on smooth shading

After making the base, I wanted to use a dynamic curve for the more realistic design of a lamp but I ran into some difficulties.


 Using a youtube tutorial (https://www.youtube.com/watch?v=KtuoFro45VU, 18:45 on 04/12/15) I reiterated the base of the tube with the mirror tool. After spending 10 minutes, I realised this process was rather laborious compared to another technique I was then told of: arrays. These give you the ability to repeat an object however many times specified


Practical development: Maya lamp

I have been quickly distinguishing the shortcuts on Maya, Autodesk, though I am used to blender shortcuts.
Learned how to switch mode and view quickly by clicking and holding the right mouse (+spacebar to change view)
 Learned to duplicate, extrude and 'loop cut and slide' or subdivide with specifications on number and alignment. F centers the selected object, and to make an object the origin (zero space)
 Pressing 2 gives a preview of the object in smooth vertex, with a bounding box.

 Some complications with selecting, which were swiftly rectified.
 Merged vertices at center to finish the back of the lamp.
 Deleted the end faces of the cone, then double clicked edges to select all adjoining edges in a ring around the cone, scaling them up accordingly to make the cone more rounded in shape.
  Extruded around and back in on itself, merging in center. Just needs a bulb (add sphere, done)

Wednesday, 2 December 2015

Animation Research

Pilling, Jayne. Animating The Unconscious. London: Wallflower Press, 2012. Print.

(Add scanned, annotated imgs)